Datasources
Configuring Azure blob storage
Prerequisites
An existing Azure Storage account is required. To get started with an Azure Storage account, refer to Microsoft’s Azure Storage documentation.
Get storage credentials
- In this step, you’ll generate all the necessary credentials to access Azure Storage.
Login to Azure portal.
In the left side navigation panel, click Storage accounts.
On the page that displays, click the name of the Storage account you want to use.
In the middle panel menu, click Access keys in the Settings section.
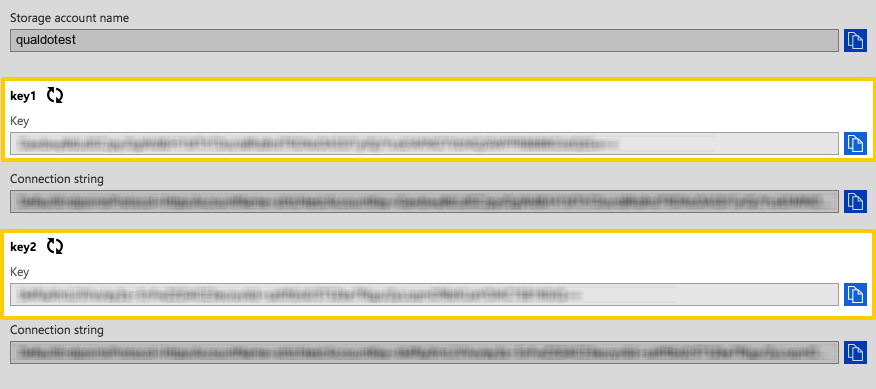
On the page that displays, copy the value for one of the Keys - you’ll need it while configuring the Storage account in Qualdo.
The Key fields are highlighted for both keys in the image below. You’ll need only one of the Keys:
Enter connection details into Qualdo
Click the Configure menu.
Click the Datasources tab.
Add or Choose Environment.
Click Add Datasources button.
Select Azure Blob from Choose Datasource dropdown, which presents under AZURE CONNECTORS.
Fill in the fields as follows: * Datasource Name - Enter the name for your Datasource. * Storage Name - Enter the name of the Storage account you want to connect to Qualdo. * Bucket Name - Enter the Container name in the Storage account. * Blob Secret - Paste the Key associated with the Storage account you selected in previous step. * Sub Path - Optional. Enter the case-sensitive string to search for particular prefix. * File Type - Enter the type of file to be monitored by Qualdo. * Refresh Type - Choose the refresh type (File Replace/File Version/ Folder Version). * Refresh Format - Choose one of the listed refresh format or provide the custom format if File Version/Folder Version refresh type is selected. * Refresh Format Occurrence - Specify the refresh format occurrence(Prefix/Suffix) in the file/folder name.
Save the Datasource
When finished, click Test Connection button. Qualdo will perform a connection test to the Microsoft Azure Blob Storage. Once the connection test is successful, click Finish Setup to save the details.
Configuring Azure Data Lake
Prerequisites
An existing Azure Data Lake Storage Gen1 account. Steps for creating an Azure Data Lake Storage Gen1 account are outside the scope of this tutorial. To get started with an Azure Data Lake Storage Gen1 account, refer to Microsoft’s Azure Data Lake Storage documentation.
An existing Azure Active Directory application. Steps for registering an App are outside the scope of this tutorial. To get started with an App registration, refer to Microsoft’s Using the Azure portal documentation.
Get App credentials
In this step, you’ll generate all the necessary credentials to access Azure Data Lake Storage Gen1.
Login to your Azure Portal.
In the left side navigation panel, click Azure Active Directory
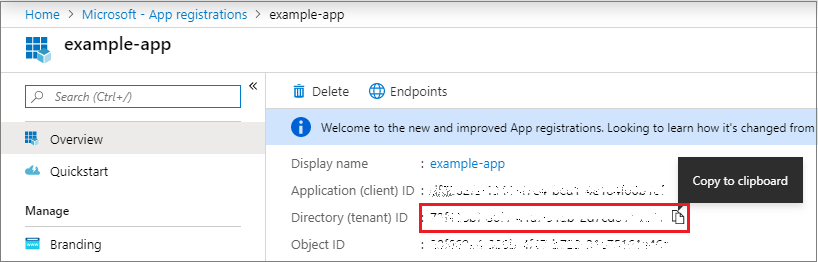
From App registrations in Azure AD, select your application.
Copy the Directory (tenant) ID - you’ll need it while configuring the Storage account in Qualdo.
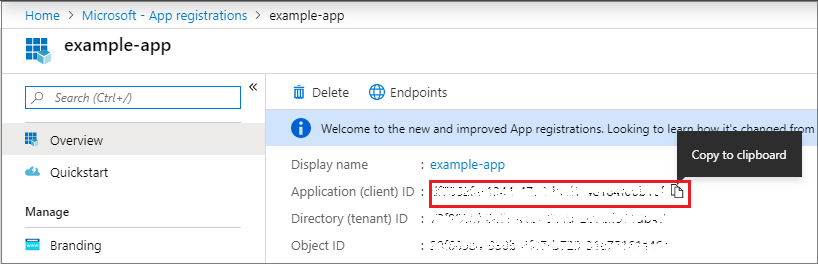
Copy the Application ID - you’ll need it while configuring the Storage account in Qualdo.
Select Certificates & secrets.
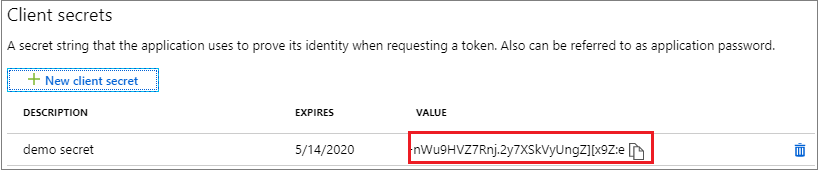
Select Client secrets -> New client secret.
Provide a description of the secret, and a duration. When done, select Add.
After saving the client secret, the value of the client secret is displayed. Copy this value because you won’t be able to retrieve the key later.
Steps to give access to the registered application
- In this step, you’ll provide access to the application whose credentials are collected in the previous steps.
Login to Azure Portal.
In the left side navigation panel, click Storage from All services
On the page that displays, click on Data Lake Storage Gen1
On the page that displays, click the name of the Storage account you want to use.
In the middle panel menu, click Data explorer in the Data Lake Storage Gen1 section.
Select the folder which you want to configure in Qualdo.
Click Access present at the top of the Data explorer.
Click Add and select the application for which you want to provide access.
Choose necessary permissions you want to provide to the application and click Ok.
Enter connection details into Qualdo
Click the Configure Menu.
Click the Datasources tab.
Add or Choose Environment.
Click Add Datasources button.
Select Azure Data Lake from Choose Datasource dropdown, which presents under AZURE CONNECTORS.
- Fill in the fields as follows:
Datasource Name - Enter the name for your Datasource.
Bucket Name - Enter the name of the Storage account you want to connect to Qualdo.
ADL Tenant ID - Paste the Directory (tenant) ID you copied from the previous step.
ADL Client Id - Paste the Application ID you copied from the previous step.
ADL Secret key - Paste the Client Secret value you copied from the previous step.
Sub Path - Optional. Enter the case-sensitive string to search for particular prefix.
File Type - Enter the type of the file to be monitored by Qualdo.
Refresh Type - Choose the refresh type (File Replace/File Version/ Folder Version).
Refresh Format - Choose one of the listed refresh format or provide the custom format if File Version/Folder Version refresh type is selected.
Refresh Format Occurrence - Specify the refresh format occurrence(Prefix/Suffix) in the file/folder name.
Save the Datasource
When finished, click Test Connection button. Qualdo will perform a connection test to the Microsoft Azure Data Lake Storage Gen1. Once the connection test is successful, click Finish Setup to save the details.
Configuring Snowflake
Prerequisites
A Snowflake Account. Sign up for a free trial on Snowflake’s website.
ACCOUNTADMIN role privileges in Snowflake, OR privileges equivalent to the SECURITYADMIN and SYSADMIN roles. More info on Snowflake’s user roles can be found here.
Enter connection details into Qualdo
Click the Configure Menu.
Click the Datasources tab.
Add or Choose Environment.
Click Add Datasources button.
Select Snowflake from Choose Datasource dropdown, which presents under DATABASE CONNECTORS.
- Fill in the fields as follows:
Datasource Name - Enter the name for your Datasource.
URL - Enter the URL of your Snowflake account. For example: qualdo.snowflakecomputing.com or xy12345.east-us-2.azure Note: Entering the http:// or https:// portion of the URL will prevent a successful connection
Username - Enter the Snowflake database username.
Password - Enter the password for the Snowflake database user.
Database - Enter the name of the database.
Warehouse - Enter the name of the Snowflake warehouse.
Table name - Optional. Enter the table name.
Incremental Data Identifier - Enter the attribute name which has to be tracked to identify new data for the refresh.
Save the Datasource
When finished, click the Test Connection button. Qualdo will perform a connection test to Snowflake. Once the connection test is successful, click Finish Setup to save the details.
Configuring Google BigQuery
Prerequisites
An existing Google Cloud Project with billing enabled. Steps for creating Google Cloud project with billing enabled are outside the scope of this document. Please refer to billing in Google Cloud project for guidance.
An existing Google BigQuery instance in the Google Cloud project. Steps for creating google bigquery are outside the scope of this document. To get started with bigquery, refer to Bigquery Web UI.
An existing Service Account. Qualdo will read the data using service account. Steps for creating service account are outside the scope of this document. To configure a Service Account, refer to Creating and managing service accounts.
Steps to give access to a Service Account
- In this step, you’ll provide permission for the Service Account to access BigQuery.
Login to Google Cloud Platform console.
In the left side navigation panel, click IAM from IAM & Admin.
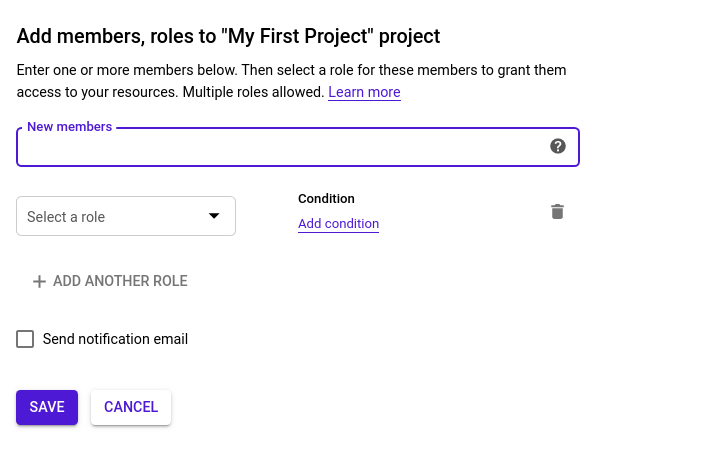
Click + Add at the top of the middle panel.
In New Members text box, enter the Service Account Email for which access is to be given.
In the Roles, select BigQuery Admin.
Click Save.
- Create JSON Key
In this step, you’ll generate and download the JSON key for the service account. The JSON key file contains information about the project, which will be used by Qualdo for accessing BigQuery.
Login to Google Cloud Platform console. In the left side navigation panel, click Service Accounts from IAM & Admin.
Look for the service account you want to generate JSON key, click *three vertical dots under Actions in that row.
Click Create Key and choose JSON in Key type.
Click Create to generate and download the JSON key file.
Enter connection details into Qualdo
Click the Configure Menu.
Click the Datasources tab.
Add or Choose Environment.
Click Add Datasources button.
Select Google BigQuery from Choose Datasource dropdown, which presents under Google Cloud CONNECTORS.
- Fill in the fields as follows:
Datasource Name - Enter the name for your Datasource.
Schema - Enter the Dataset name.
Table Name - Optional. Enter the table name.
Service Account JSON - Upload the JSON key file which you downloaded in the previous step.
Incremental Data Identifier - Enter the attribute name which has to be tracked to identify new data for the refresh. The attribute has to be in timestamp format.
Save the Datasource
When finished, click Test Connection button. Qualdo will perform a connection test to the Google BigQuery. Once the connection test is successful, click Finish Setup to save the details.
Configuring AWS S3
Prerequisites
An existing AWS S3 Bucket. Steps for creating AWS S3 bucket are outside the scope of this document. For gettings started with Aws S3 bucket refer to Amazon S3.
Get storage credentials
In this step, you’ll generate all the necessary credentials to access Amazon S3.
To create an access key when signed in as the root user
Sign in to the AWS Management Console as the root user. For more information, see Sign in as the root user in the IAM User Guide.
In the navigation bar on the upper right, choose your account name or number and then choose My Security Credentials.
Expand the Access keys (access key ID and secret access key) section.
Choose Create New Access Key. If you already have two access keys, this button is disabled. Copy the created access key somewhere handy. This will be required while configuring S3 in qualdo.
When prompted, choose Show Access Key or Download Key File. This is your only opportunity to save your secret access key. Copy the secret access key somewhere handy. This will be required while configuring S3 in qualdo.
After you’ve saved your secret access key in a secure location, chose Close.
To create an access key when signed in as an IAM user
Sign in to the AWS Management Console as an IAM user. For more information, see Sign in as an IAM user in the IAM User Guide.
In the navigation bar on the upper right, choose your user name and then choose My Security Credentials.
Choose AWS IAM credentials, Create access key. If you already have two access keys, the console displays a “Limited exceeded” error. Copy the created acess key somewhere handy. This will be required while configuring S3 in qualdo.
When prompted, choose Download .csv file or Show secret access key. This is your only opportunity to save your secret access key. Copy the secret access key somewhere handy. This will be required while configuring S3 in qualdo.
After you’ve saved your secret access key in a secure location, chose Close.
Enter connection details into Qualdo
Click the Configure Menu.
Click the Datasources tab.
Add or Choose Environment.
Click Add Datasources button.
Select AWS S3 from Choose Datasource dropdown, which presents under AWS CONNECTORS.
- Fill in the fields as follows:
Datasource Name - Enter the name for your Datasource.
Bucket Name - Enter the bucket name.
Access Key - Paste the Access Key you copied from the previous step.
Secret Access Key - Paste the Secret Access Key you copied from the previous step.
Sub Path - Optional. Enter string to search for particular prefix. It’s case-sensitive.
File Type - Enter the type of the file to be monitored by Qualdo.
Refresh Type - Choose the refresh type (File Replace/File Version/ Folder Version).
Refresh Format - Choose one of the listed refresh format or provide the custom format if File Version/Folder Version refresh type is selected.
Refresh Format Occurrence - Specify the refresh format occurrence(Prefix/Suffix) in the file/folder name.
Save the Datasource
When finished, click Test Connection button. Qualdo will perform a connection test to AWS S3. Once the connection test is successful, click Finish Setup to save the details.
Configuring PostgreSQL
Prerequisites
A PostgreSQL Database instance.
Enter connection details into Qualdo
Click the Configure Menu.
Click the Datasources tab.
Add or Choose Environment.
Click Add Datasources button.
Select PostgreSQL from Choose Datasource dropdown, which presents under DATABASE CONNECTORS.
- Fill in the fields as follows:
Datasource Name - Enter the name for your Datasource.
Host - Enter the PostgreSQL database host url or IP address. Note - Port is not needed.
Username - Enter the PostgreSQL database username.
Password - Enter the password for the PostgreSQL database user.
Database - Enter the name of the PostgreSQL database.
Schema - Enter the name of the schema.
Table name - Optional. Enter the table name.
Incremental Data Identifier - Enter the attribute name which has to be tracked to identify new data for the refresh. The attribute has to be in timestamp format.
Save the Datasource
When finished, click the Test Connection button. Qualdo will perform a connection test to Postgres. Once the connection test is successful, click Finish Setup to save the details.
Configuring MySQL
Prerequisites
A MySQL Database instance.
Enter connection details into Qualdo
Click the Configure Menu.
Click the Datasources tab.
Add or Choose Environment.
Click Add Datasources button.
Select MySQL from Choose Datasource dropdown, which presents under DATABASE CONNECTORS.
- Fill in the fields as follows:
Datasource Name - Enter the name for your Datasource.
Host - Enter the MySQL database host url or IP address.
Username - Enter the MySQL database username.
Password - Enter the password for the MySQL database user.
Database - Enter the name of the MySQL database.
Table name - Optional. Enter the table name.
Incremental Data Identifier - Enter the attribute name which has to be tracked to identify new data for the refresh. The attribute has to be in timestamp format.
Save the Datasource
When finished, click the Test Connection button. Qualdo will perform a connection test to MySQL. Once the connection test is successful, click Finish Setup to save the details.
Configuring Azure SQLServer
Prerequisites
A Azure SQLServer instance.
Enter connection details into Qualdo
Click the Configure Menu.
Click the Datasources tab.
Add or Choose Environment.
Click Add Datasources button.
Select Azure SQLServer from Choose Datasource dropdown, which presents under AZURE CONNECTORS.
- Fill in the fields as follows:
Datasource Name - Enter the name for your Datasource.
Host - Enter the SQL Server host url or IP address. Note - Port is not needed.
Username - Enter the SQL Server username.
Password - Enter the password for the SQL Server user.
Database - Enter the name of the SQL Server database.
Schema - Enter the name of the schema.
Table name - Optional. Enter the table name.
Incremental Data Identifier - Enter the attribute name which has to be tracked to identify new data for the refresh. The attribute has to be in timestamp format.
Save the Datasource
When finished, click the Test Connection button. Qualdo will perform a connection test to Azure SQL Server. Once the connection test is successful, click Finish Setup to save the details.
Configuring Google Cloud SQLServer
Prerequisites
A Google Cloud SQLServer instance.
Enter connection details into Qualdo
Click the Configure Menu.
Click the Datasources tab.
Add or Choose Environment.
Click Add Datasources button.
Select Google Cloud SQLServer from Choose Datasource dropdown, which presents under Google Cloud CONNECTORS.
- Fill in the fields as follows:
Datasource Name - Enter the name for your Datasource.
Host - Enter the SQL Server host url or IP address. Note - Port is not needed.
Username - Enter the SQL Server username.
Password - Enter the password for the SQL Server user.
Database - Enter the name of the SQL Server database.
Schema - Enter the name of the schema.
Table name - Optional. Enter the table name.
Incremental Data Identifier - Enter the attribute name which has to be tracked to identify new data for the refresh. The attribute has to be in timestamp format.
Save the Datasource
When finished, click the Test Connection button. Qualdo will perform a connection test to Google Cloud SQL Server. Once the connection test is successful, click Finish Setup to save the details.
Configuring AWS Redshift
Prerequisites
A AWS Redshift instance.
Enter connection details into Qualdo
Click the Configure Menu.
Click the Datasources tab.
Add or Choose Environment.
Click Add Datasources button.
Select AWS Redshift SQLServer from Choose Datasource dropdown, which presents under AWS CONNECTORS.
- Fill in the fields as follows:
Datasource Name - Enter the name for your Datasource.
Host - Enter the Redshift instance host url or IP address. Note - Port is not needed.
Username - Enter the Redshift username.
Password - Enter the password for the Redshift user.
Database - Enter the name of the Redshift database.
Schema - Enter the name of the schema.
Table name - Optional. Enter the table name.
Incremental Data Identifier - Enter the attribute name which has to be tracked to identify new data for the refresh. The attribute has to be in timestamp format.
Save the Datasource
When finished, click the Test Connection button. Qualdo will perform a connection test to AWS Redshift. Once the connection test is successful, click Finish Setup to save the details.